By now, you'll have seen the new Template Designer facility on Blogger and may have experimented. You may also have a custom background and wonder whether it will work templates other than Minima.The answer is YES - with the proviso you read this tutorial very carefully first, so you don't lose anything you want to keep on your blog.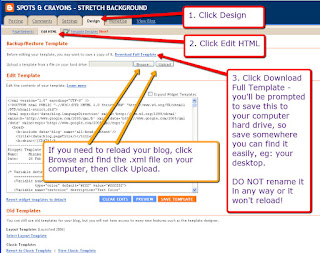 |
| Make sure you save your blog template |
First thing to do before you do ANYTHING is to save a copy of your blog. This takes seconds - and you may be very glad you did, if you like experimenting with layouts and then save by mistake and lose all your widgets! CHANGING TO ONE OF THE OLDER TEMPLATESIf using one of the old templates, make sure you Preview (link under the template) FIRST before you apply it, in case you don't like it. Also, you'll be given the option to Save Your Widgets, so make sure you click to save your widgets or you
will lose them permanently.
Be aware that any template changes you made to your html (numbered comments, signatures, post dividers etc) will be lost and will have to be reinstalled
INSTALLING USING ONE OF THE NEW TEMPLATE DESIGNER TEMPLATES The new Template Designer templates show in a split screen as you are working, so whatever changes you make will show immediately. When saving the template you'll be given the option to save your widgets, so make sure you click to Save Your Widgets or you
will lose them permanently.
Be aware that any template changes you made to your html (numbered comments, signatures, post dividers etc) will be lost and will have to be reinstalled.
I'VE GOT A CUSTOM TEMPLATEQ: Can I use one of the new Designer Templates with my custom (or freebie) template?A: Some work better than others - some want to default the design shown, and some will add a thick horizontal strip behind the header and across the top of your blog background. Preview it first - you may like the result, or you may not. If you don't save it, it won't install. If you did save it, hopefully you saved a copy of your blog to your hard drive before you started playing (whch you can simply reload, no damage done).
THESE TEMPLATES WILL WORK BEAUTIFULLY:- Choose from any of the Picture Window choices.
- Choose from Awesome 1, 2, 3, 4 or 6
- Choose from Watermark 1 and 2
AVOID: - Awesome 5 (this will give you a white horizontal box right across, behind your header)
- Watermark 4 and 5
- Simple (all of these will give you a broad horizontal box right across, behind your header)
HERE'S HOW IT WORKS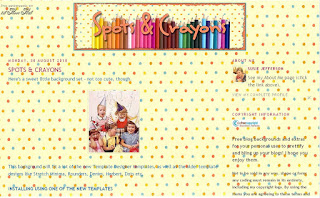 |
| Stretch Minima |
This is one of my backgrounds using the Stretch Minima template - which also works well with other templates, especially the new Template Designer ones.
Now let's change the actual template:
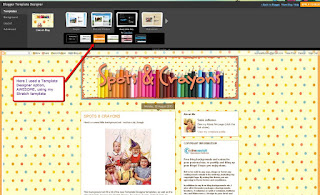 |
| Click on Design - Template Designer - Templates |
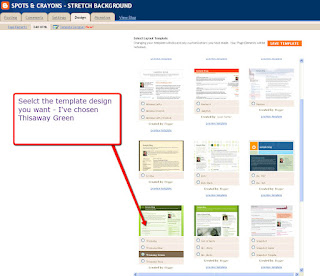
LAYOUTS: I've chosen AWESOME template No 3
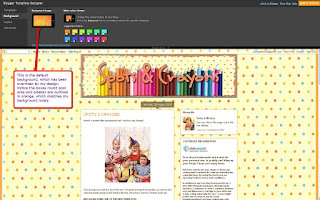 |
| This is the default design for this particular template - you can change this (see tutorial link below) |
BACKGROUND: This is the default background. Let's change it.
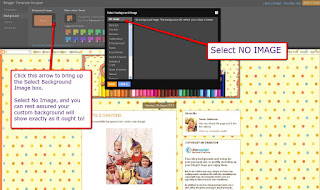 |
| You can see this is the default background - I've selected NO IMAGE |
By selecting No Image some templates will default to the main colours of your blog background, and others will give you a choice of ticking a colour - or Transparent (ie: no colour). So your custom background will show exactly as it should.
LAYOUT: Here is where you can adjust the actual layout (number of columns etc) plus the width of your blog and your footer options (columns, no columns etc)
 |
| Advanced options: fonts - sizes, colours etc |
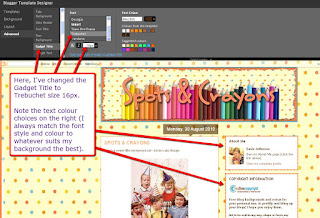
ADVANCED: You can adjust the font, the colour, the size etc. Also the default title if you don't want to use an image for your banner or header. In Designer, the area where you make your changes is easy to see: it's outlined very clearly.
 |
| More adjustments |
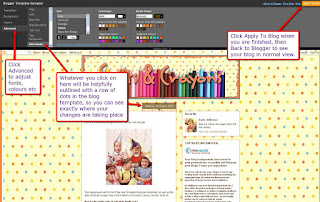
Here you can see what adjustments I have chosen.
 |
| Final tweaks |
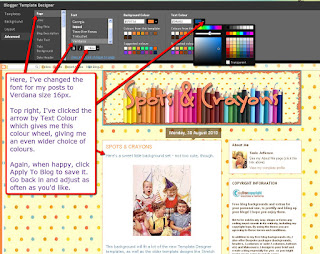
If you don't like the colour options shown, click the arrow to the side of a box to bring up a larger box showing colour wheel and transparency options.
HOW TO CHANGE TO ONE OF THE OLD-STYLE TEMPLATES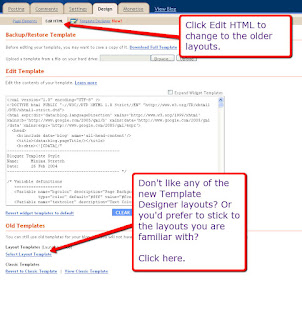 |
| Older template option |
Click on Design - Edit HTML, which will bring you to a new page showing the older Blogger templates.
 |
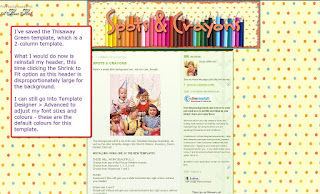
| Thisaway template |
I've chosen THISAWAY in the green option. I'm still using my original Stretch background and header, and have only uploaded this template. You'll notice all the fonts etc have changed to the Blogger default for this template.
 |
| Template added to same Stretch background |
You can see the header size is all wrong! This is a 2-column background with a set width (unlike the Designer ones, where you can set the width yourself).
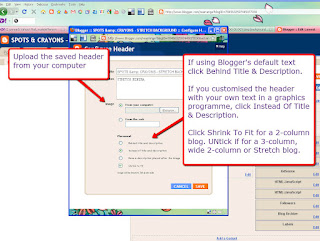 |
| Adjusting header width to fit your template |
I've deleted my header, then reloaded it - this time I've clicked the Shrink To Fit option, so the header fits the background correctly.
 |
| The result |
That's much better! Now I'm changing the template again - this time to STRETCH LEFTY.
 |
| Another template: STRETCH LEFTY |
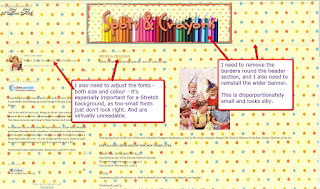
The Stretch Lefty template defaults the fonts etc again, so I'll need to adjust these. I also need to remove the two thin borders around the header area as they don't look right with my banner.
I also have the option of NOT using my banner, and use Blogger's default text for the header. In this case, I might prefer to keep the borders - but make them thicker and more punchy.
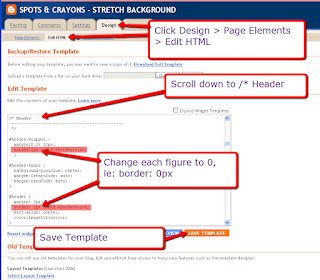 |
| Removing Blogger's default borders from around the header |
To remove the borders, go to Design - Page Elements - Edit HTML and scroll down until you find the Header section (see pic above).
 |
| This is how it will look |
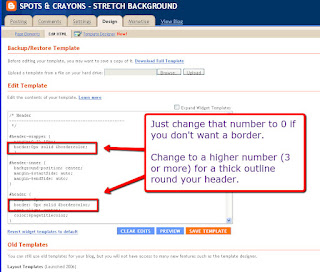
Change the numbers - to remove the borders change the numbers to 0. To make them more punchy, make the numbers larger (3px or 5px are a nice size). The two borders don't have to be the same thickness, either.
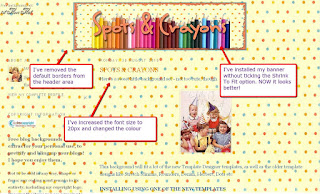 |
| The result! |
I've changed the font size and colour, removed the borders and this is the final result. Minima Lefty has a transparent template, so you see the whole pattern of the design.
Again, I just want to remind you that saving any of these templates will result in your losing any customisation (like removing the borders round the header, for example). You will be prompted to save your widgets - but nothing is foolproof, so if you have loads of widgets, make sure you save your template FIRST.
FURTHER TUTORIALSThe new Blogger TemplatesAdjusting and centering Blogger's default headerI've also put this entire tutorial on my Computery blog, for archiving.


Comments
Post a Comment
Thank you so much for leaving a comment!